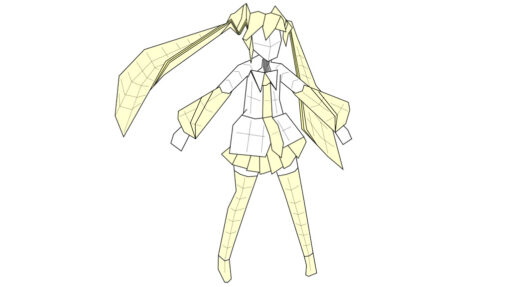
Walking in the rain by Chen Xiao (Twitter. Flickr) is one of his most fascinating and, at the same time, one of his simplest models.

I have to say that, for this model, only the crease pattern is available on the Internet. Unfortunately, the available crease pattern is not fully accurate from a flat-foldability standpoint. Nevertheless, that should not pose an obstacle to fold the model since the accurate version is available in figure 1.

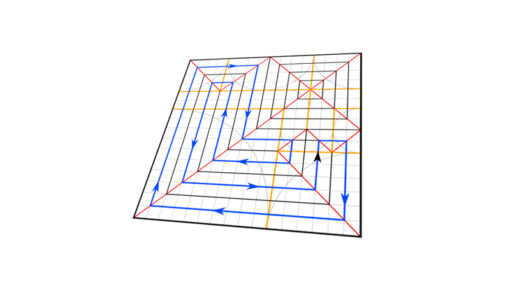
The crease pattern in figure 2, may look complex, but it is not. It has only two features that could be considered advanced. Everything else belongs to the category of ordinary elements of a box pleated technique.
Spreading of the flap
The model itself is most of all known by its characteristic elements. Namely, dress, sleeves, and umbrella. All of them are made based on the same principle or technique. But before we start with in-depth explanations, let me show you where these elements are positioned on the crease pattern and how their folded forms look like.
In figure 3, all of them are marked and their folded form is shown.
The most characteristic one and probably the easiest to recognize is the umbrella. The element is of considerable size and as such requires a lot of paper. Therefore, the model should be made out of very thin paper to get satisfactory results. But how exactly the umbrella is designed is the major question?
So let’s begin with the crease pattern analysis. Let’s see what we really have on the crease pattern. If we focus on the three unique elements mentioned earlier, we will realise that they are all, in their essence, flaps placed in the paper corners. But, they cannot be flaps of any type. They have to be flaps with a so-called wide tip. Flaps with a pointed tip are not eligible for this purpose, and I will show you why.
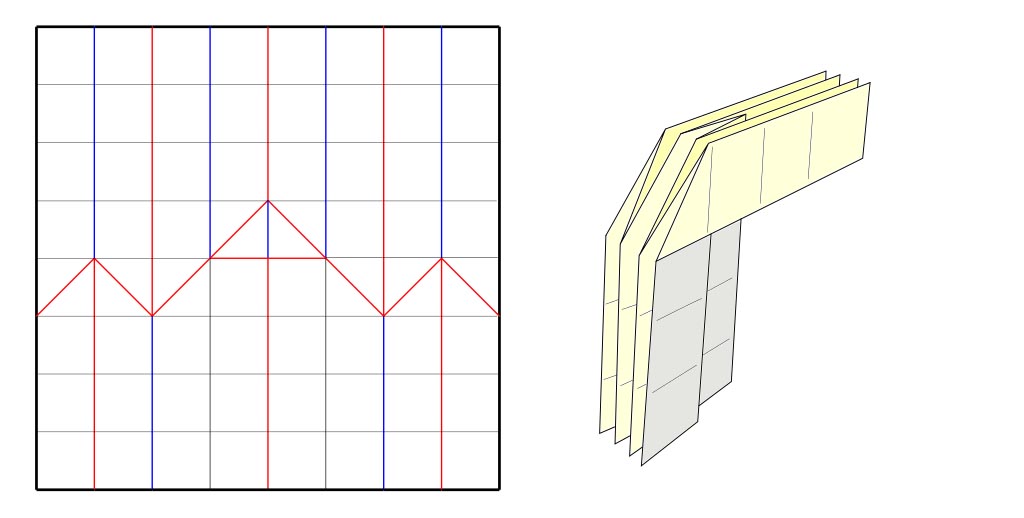
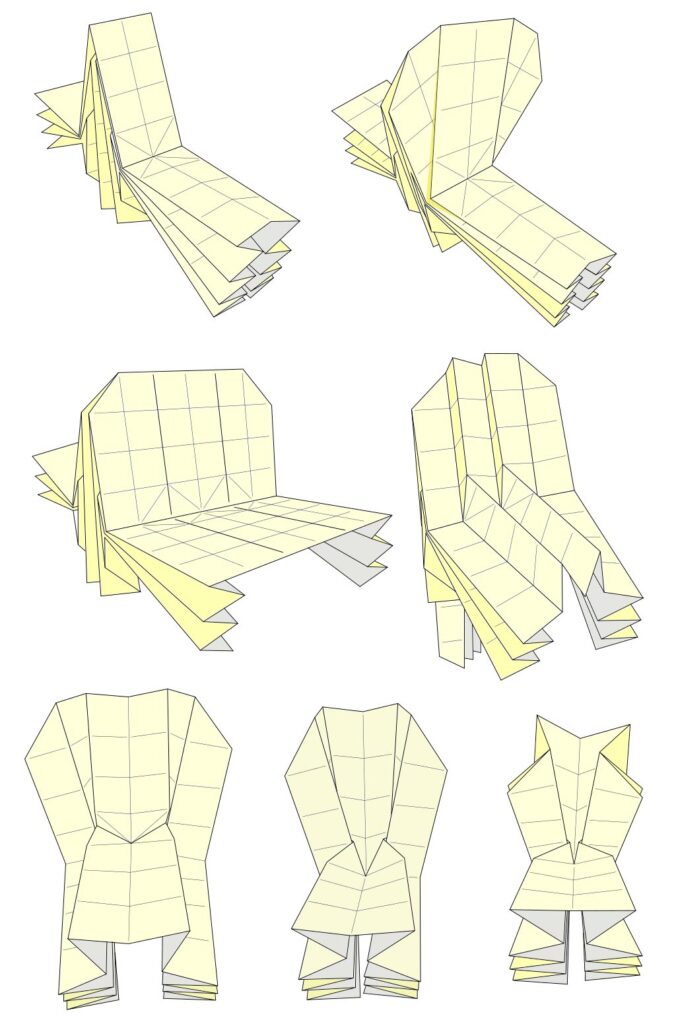
Let’s imagine that we have a flap in the shape of an accordion and that it is bent in the middle (figure 4).
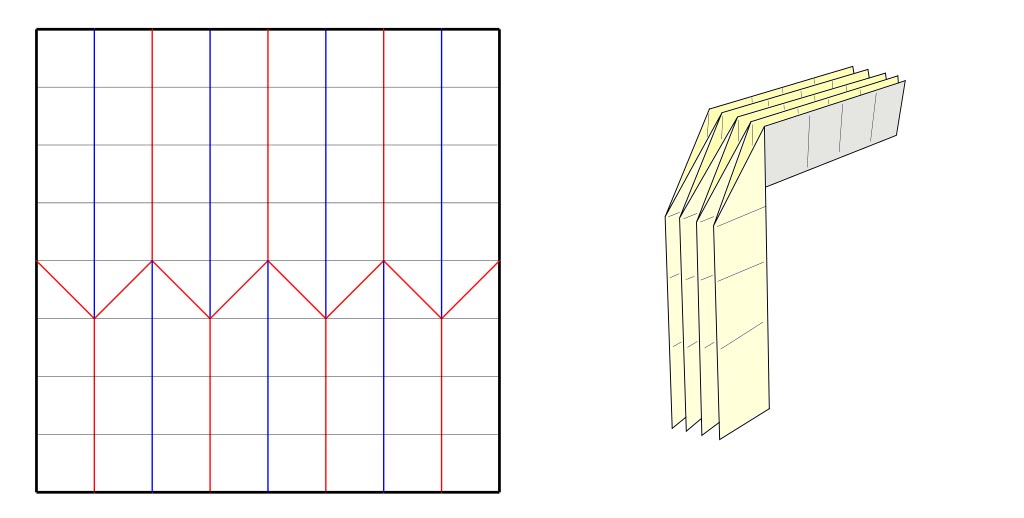
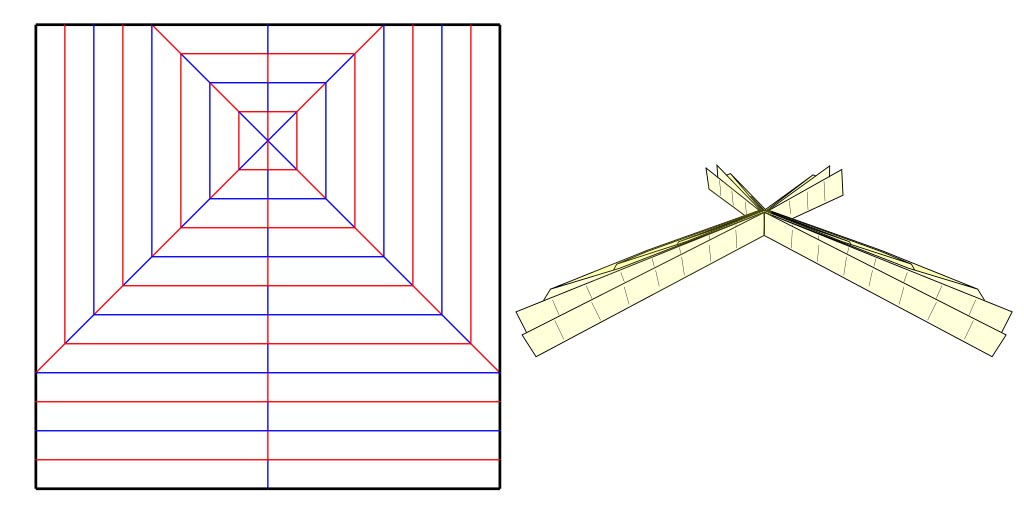
By bending the flap, we staged the situation in which we are allowed to open one of its central creases without affecting the rest of the flap beyond the bending point. Look at figure 5. One of its central creases is obviously opened. But, as you can see, the opening itself does not affect the rest of the accordion beyond the bending point. The rest of the model stays the same.
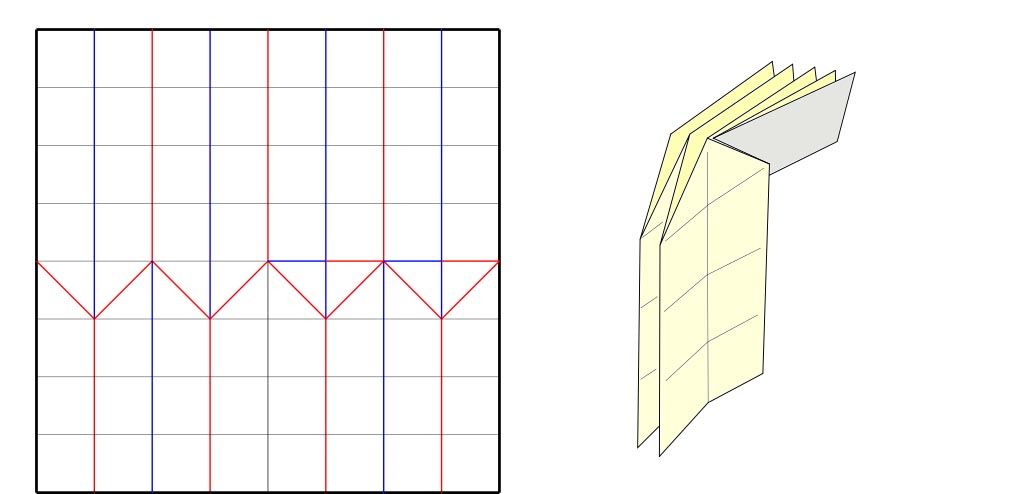
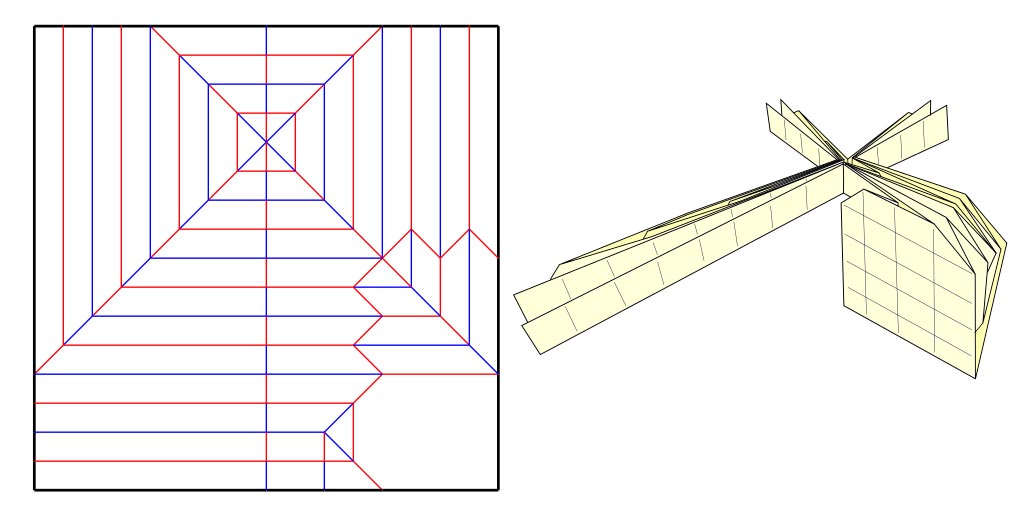
As you can see, a large surface area has emerged, which is nice. What is more, if we change the way the flap is bent, the new emerging surface could be made even larger. With this in mind, let’s consider yet another example (figure 6).
As you can see, a slight difference in the way we performed the bending allows us to acquire a much larger surface upon opening one of its central creases.

I hope the logic behind this manoeuvre is more or less clear. But one question remains, how could this technique be incorporated into the more complex models?
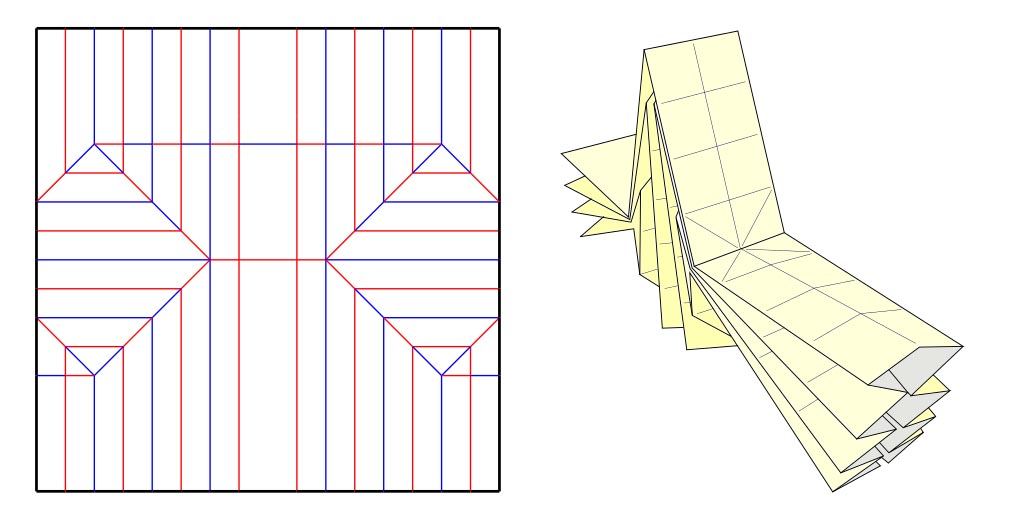
Let me show you. Let’s bend and spread a flap in the presence of other flaps to see if there are any differences. In figure 8, a simple base is shown. Please, pay special attention to the fact that none of the flaps has pointed tips, and all flaps are in pairs. This will allow us to compare the final result.
As you can see, we have two identical large and two identical small flaps. Now, we will bend one of the larger flaps and then we will try to spread it along one of its central creases. The final result is shown in figure 9
It is obvious that we have sacrificed flap length in exchange for a larger surface.
That is all you have to know about how Chen Xiao has created the three most well known features of his model.
Elias stretch on central flap
Another interesting feature of this model is the way the front side of the kimono is constructed. It is constructed out of two central flaps, one of which is especially interesting. Namely, the upper part of the kimono, plus the belt, also known as obi, is constructed out of a single central flap by utilising a very interesting concept.
Why is this construction approach so interesting? Because it stages the situation in which an Elias stretch can be applied on a central flap. You see, it was always deemed impossible to implement the Elias stretch technique on the flaps that are not on a paper edge. That was always considered a definite rule. But not this time. Here we have a central flap on which the Elias stretch technique can be applied. The only question is how?
I would be glad if I could tell you: easily. But frankly speaking, it is not.
As you probably know, the configuration of central flaps is not very flexible. After all, their ridge creases are almost invisible, thus forming a configuration that is not very useful. I hope you agree. You cannot do much with all that paper buried inside the central flaps (look at figure 10). The substantial amount of paper inside the central flap is simply wasted.
What we want is a flap that is fully opened, meaning the flap whose inner layers are fully accessible. We want something in the line with the example in figure 11. The problem with such manoeuvre is that the flat-foldability status of a model is inevitably lost. Nevertheless, such manoeuvre is desirable since it will allow us to utilize the central flap in many interesting ways. Among those, the implementation of Elias stretch technique is just one of the most interesting examples.

If we want to perform Elias stretch, meaning if we want to divide one central flap into two, we have to assume its leading-edge to be a paper edge, at least figuratively. Such mental jiu-jitsu is not a problem. Meaning, upon central flap opening, we have to press all paper layers of the open central flap together, so they act as a single layer of paper. In other words, we will act as if two paper layers are, in fact, a single layer (the paper will be twice as thick). That part is relatively simple. The next step is more challenging since we have to fold the central flap back into the shape of the accordion. At first glance, such a manoeuvre seems impossible, but with a simple trick, it could be done.
In figure 12, you can see a rear view of the model (this is the same model as in figure 10). As you can see, the manoeuvre we are talking about assumes stretching the inner layers of the central flap first and then collapsing them back. But this time, the paper layers will not collapse back inside each other. Rather, they will all collapse in front of the central flap. Of course, by performing this manoeuvre, some rearrangement of an adjacent flap is inevitable because two flaps will collide in the process.
The result is a new and rearranged central flap whose paper layers are, for the most part free. Of course, the paper inside the central flap is double thick since every layer consists of two paper layers. Be aware of that. Nevertheless, the central flap reconfigured in this way is open to additional reconfiguration. Namely, now we can implement Elias stretch on it if we want to.
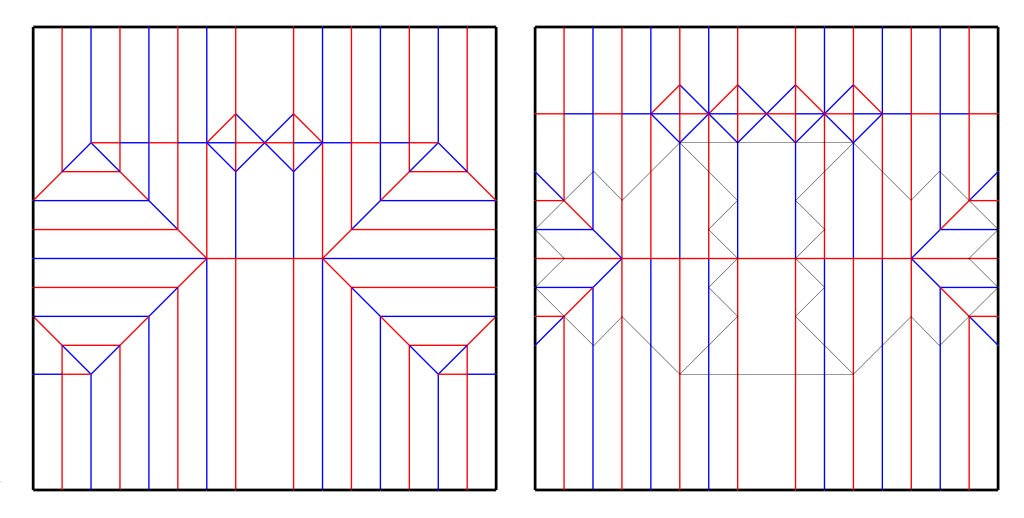
In the end, it would be interesting to see the impact this approach has on the crease pattern. In figure 13, the difference between crease patterns, before and after the just shown manoeuvre, is obvious. The only difference is two diamond-shaped elements. There are here to resolve the collision problem between various paper layers of the central flap and one of its adjacent flaps.

So, if you wondered, what is the purpose of diamond-shaped elements on Walking on the rain crease pattern (figure 2), now you know. They are the result of the central flap reconfiguration. Or vice versa, if you like, they are here to allow reconfiguration of the central flap.
As far as I know, Chen Xiao used this technique most extensively in his model called Kannon (Flickr, Twitter). The only difference is that in Kannon, the only basic form is used, whereas in Walking in the rain, a more complex version is presented, which incorporates the belt (obi) inside a single central flap. So let’s analyze this more complex version.

The crease pattern (figure 14) is relatively complex, but at the same time, it can be compared to the previously presented example. Let’s simplify our example and try to collapse the crease pattern step by step. Compared to the previous example, the new one has a broader central flap and that is all. Everything else is literally the same. In figure 15 you can see both crease patterns side by side. There are not many differences.
Again, what we are trying to accomplish by this manoeuvre, is to make the central flap more useful in a sense it could be comparable to edge flaps which enjoy a much greater degree of freedom. How this manoeuvre looks on the broader flap can be seen in figure 16.
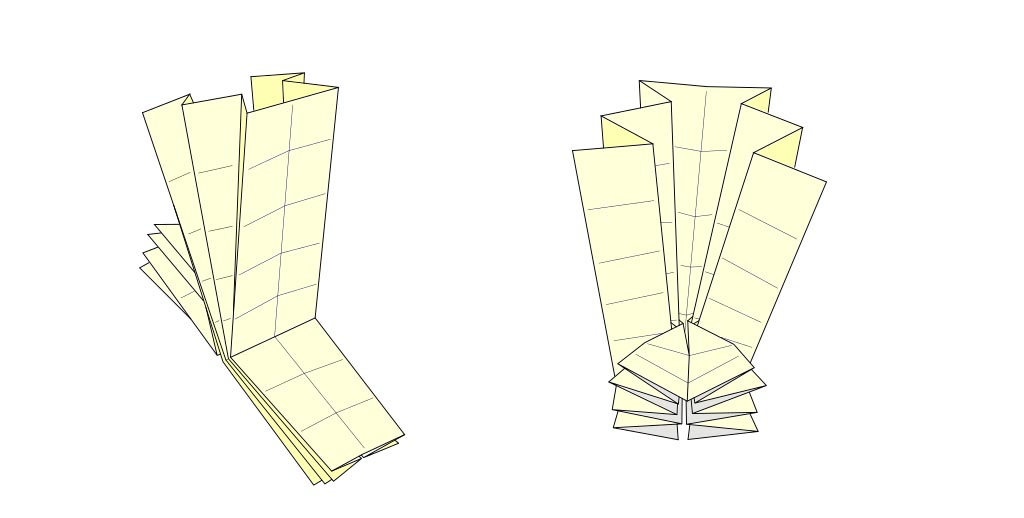
Upon acquiring this kind of central flap configuration, all sorts of possibilities lie ahead. One possibility is, of course, to perform Elias stretch and effectively create two flaps out of one (figure 17)

In the case of the Walking in the rain model, two flaps obtained in this way would be too long. Therefore, these two flaps are shortened, and the surplus of paper is used for the belt (obi). How this is done, can be seen in figure 18.

In the end, a few words about the crease pattern. Original Walking of the rain crease pattern is a bit more complex if compared to the one shown in figure 15. Additional complexity is due to the additional manoeuvres needed to perform Elias stretch and to fold a belt. That’s why the extra creases are present on the original crease pattern.
Collapsing
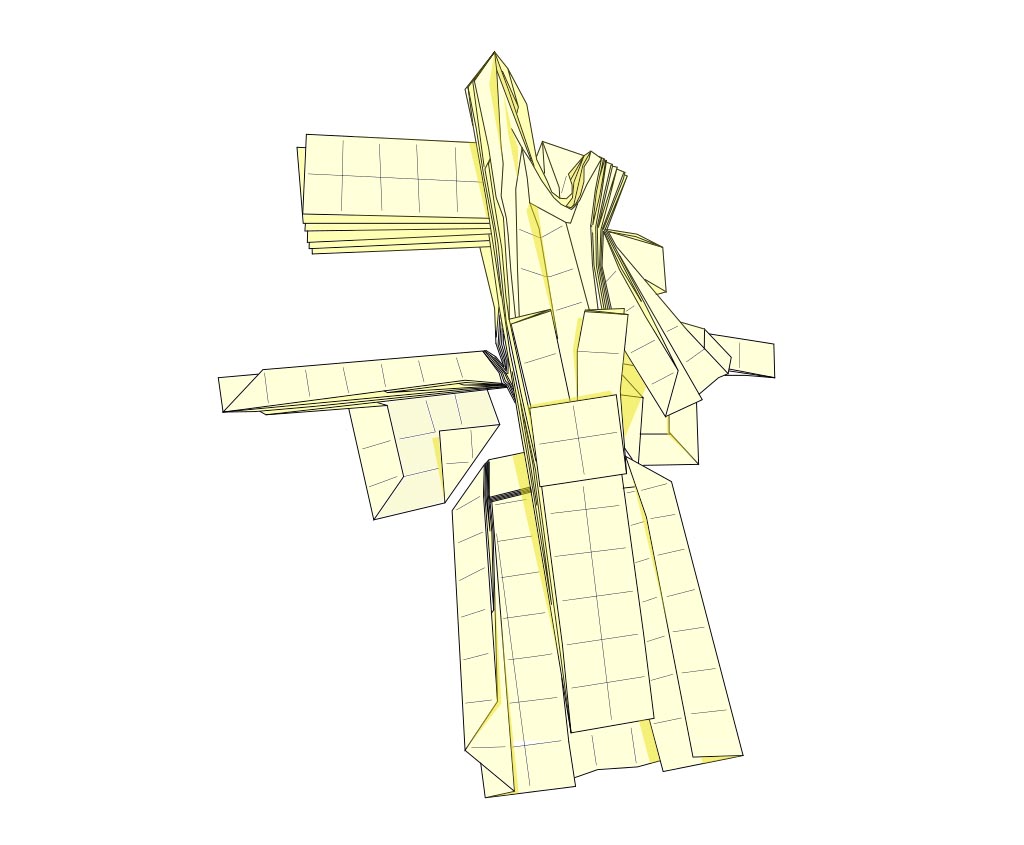
The collapsing strategy is simple and straightforward. Since we have two large central flaps on the main axis, it is logical to start with them. One of them is a little bit more complicated, but it should also be folded in its basic form (figure 14). The reconfiguration will be done later. The second step is to collapse all flaps that form the head and hair. Here, we also have several central flaps. Luckily, the flaps are near the paper edge, so the problem is easily solvable. I believe you are not going to have a problem with these flaps. And last, we have to collapse all the edge flaps. Most of them exhibit the feature explained at the beginning of the post.
A fully collapsed base can be seen in figure 19.
Conclusion
Walking in the rain is remarkable and at the same time a very simple model that can surprise you in so many ways. Chen Xiao possesses the rare ability to exploit the same concept in so many different ways. His models are textbook examples of creativity. Walking in the rain is certainly one of those models.